Here is the sixth glitter house from my "DIY Christmas Village" step-by-step tutorial series. My goal is to create several different houses in order to build my own Christmas village set - you are welcome to join me in my journey!
Making handmade Christmas decorations is a popular and great craft idea, and I am sure that you will have as much fun as me creating a modern version of old vintage Putz houses!
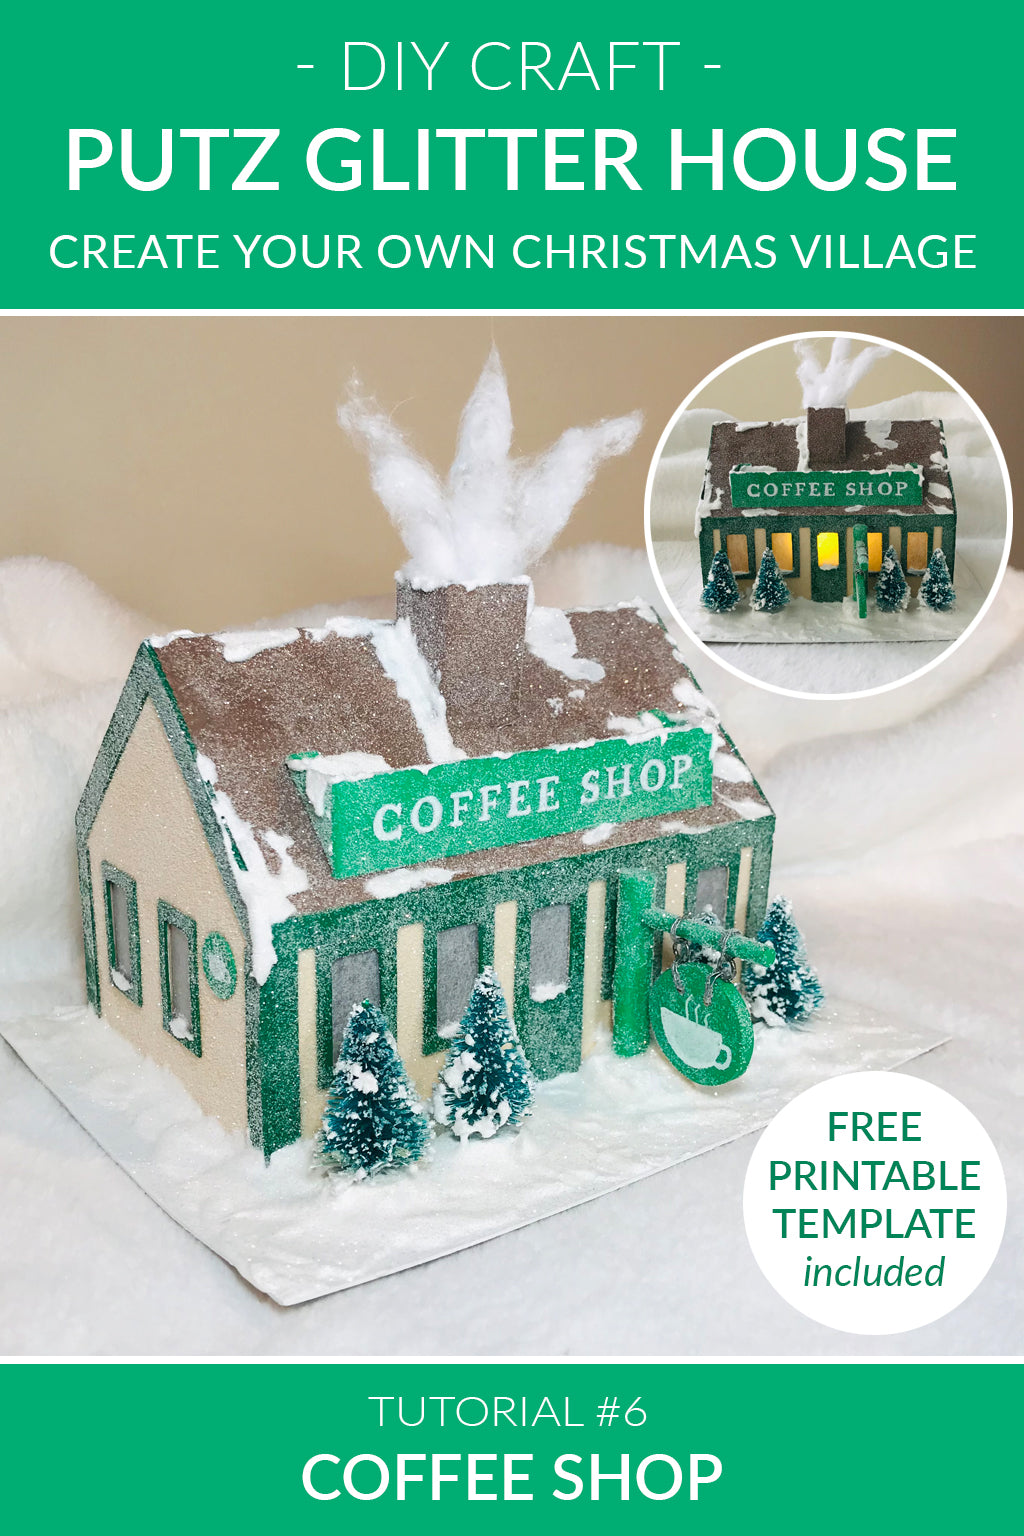
The current project will allow you to make a cute COFFEE SHOP.
If you missed the first tutorials, you can find them all here.
The design of the building for my coffee shop is inspired by the Starbucks store in Freeport, Maine, as this specific Starbucks has a special place in my heart:
Materials you will need:• Free printable template (+ letter size paper & printer to print it)• Cardboard / kraft chipboard sheets (I use letter size ones - 8.5x11 inches) • X-acto knife / utility knife • Scissors • Cutting mat • Metallic ruler • Masking tape • Pencil • Vellum / tracing paper (translucent paper) • Glue stick • White craft glue • Glue brush (or old or cheap brush) • Acrylic paint • Paintbrushes • Cup of water (to wash your brushes) • Plates or palettes (to mix/pour paint, glue, snow, medium) • Paint marker or fine tip paintbrush (for the lettering of the banner and the logos) • Fake snow - you can buy it (Snow-Tex, True Snow, etc.), or you can make it • Palette knife or stick • Non-yellowing fluid medium (I am using Liquitex Acrylic Fluid Gloss Medium, but you may also use any non-yellowing medium or finish) • Glitter (I use Hemway Ultra Fine Craft Glitter - Iridescent White) • Shaker or spoon (to sprinkle the glitter) • Plate to collect the glitter leftovers • Cotton ball Optional: • Miniature accessories (sisal trees or other) • For the wooden logo post: wood dowels (I used 5/16 + 1/8 inches diameter), one wood disc or slice (I used 0.75 inch diameter), drill, hanging hardware (I used wire and metal jump rings, but you can use a string or any other stuff that works) • Flicker light (battery operated LED tea light candle) • Christmas music - to get you in the mood :) |
Step 1 - Cut + Fold the Pieces
First, you will need to download and print my free printable template here.
The template is for a 5.25 x 3.5 inches house, on a 7 x 5.5 inches base.
Since I already explained and pictured in depth the folding & cutting steps in my first tutorial, and since the method is essentially the same for all houses, I will simply resume the steps here. But you can refer to the pictures in my first tutorial if you are not sure how to proceed.
Cutting:
Using masking tape, fix each page of the template to a cardboard.
Take an x-acto or utility knife, a metallic ruler and a cutting mat. Make sure that your x-acto blade is new, to provide the sharpest and cleanest cut possible.
The cut lines are the solid lines. Start with all the holes (windows, light hole).
Continue cutting along all the other cut lines. You can use scissors for these instead of the x-acto, if you prefer.
Do NOT cut along the dotted (dashed) lines - these are fold lines.
*TIP: If you plan to make several houses based on the current template, use the cut cardboards as patterns to trace all your houses before proceeding to the next steps. This will save you time (and paper).

Scoring:
Scoring will allow you to make an easy, clean and crisp fold.
Take the first cut cardboard piece and its cut paper template. Based on the paper template, trace the fold lines on the BACK of the cardboard piece with a pencil. Do the same for all cardboard pieces.
Using an x-acto and metallic ruler, make a LIGHT score line along the fold lines. Do not press down hard with the x-acto - you only want to slightly and gently slice a thin layer of the cardboard fibers.
Folding:
Once all scoring is done, gently and slightly fold along the score lines towards the opposite side of the cardboard (towards the front of the piece) - this will "break" the folds.
Now make the "final" folds, toward the back of the piece. Press firmly all along the folds.
All of the pieces are now done:

*NOTE: make sure to keep the piece of paper from the template that has the words "Coffee Shop" printed on it - you will need it later to trace the letters on the shop banner.
Step 2 - Frost the Windows
For this step, you will need: vellum paper (or any translucent paper of your choice), pencil, scissors and glue stick.
Working on the back side of the pieces (the side that will be inside the house), trace and cut pieces of vellum paper to cover the window holes of each side/wall of the house.
The light hole on the back wall should NOT be covered with vellum paper - it must remain an open hole in order for you to be able to insert a LED flicker light later.
Carefully glue the vellum pieces to the cardboard with glue stick. Make sure that the vellum is glued flat and without any wrinkles.

Step 3 - Assemble the House
For this step, you will need: good white craft glue (I used Aleene's Original Tacky Glue), glue brush (or an old or cheap brush), and plate to pour the glue.
Working one glue tab at a time, apply a thin layer of glue on the tab with the brush. Then carefully align both parts together and firmly press down all along the tab and hold until you feel that both parts are bonded enough to stay together (it usually takes only a few seconds with the Tacky Glue).
I recommend proceeding in that order:
1. Walls of the house
2. Flaps supporting the roof (the rectangular flaps go under the triangular ones)
3. Roof
4. House on the base
5. Chimney
Do NOT glue the banner and the cutouts for the doors, windows, etc. yet - we will need to paint them first, this will make our job a lot easier.
Let the glue dry completely before proceeding to the next step.
In the meantime, choose your paint colors and accessories (optional), and set up your work station for the painting step.
*OPTIONAL: if you will be adding a wooden logo post, now would be the time to measure and cut your dowels, and to drill the holes. On my end, I cut the 5/16" dowel at ±1.75" and the 1/8" dowel at ±1.375".


![]()
Step 4 - Paint the House
For this step, you will need: acrylic paint, paint brushes, palette and cup of water to wash your brushes.
I painted the ground in white (snow!), and the house in beige, brown and green - but of course you can use any color you want.
I also painted the stand of the sisal trees in white.
Painting the cutouts can be messy, so I worked on a piece of paper for that part - just make sure to move the pieces to a clean spot quickly after painting them, so they do not stick to the paper when the paint dries.
Let the paint dry completely.


Step 5 - Add the Accessories
Glue the cutouts for the window frames, doors and other decorations to the house. I personally prefer to use a thin layer of white glue for this, but you can use glue stick if you prefer.
Then, glue the banner to the roof and the trees to the base with white glue.
If you are adding a wooden post, glue the dowels together and attach the wood disc to the post.

![]()
Step 6 - Add the Snow
For this step, you will need: fake snow and a palette knife (or stick or brush).
You can either buy synthetic snow - DecoArt Snow-Tex, Aleene's True Snow, etc. - or you can make it yourself using my fake snow recipe.
I spread the snow in that order:
1. Ground, stand of the trees, around the house at the foot of the walls
2. Edges of the windows
3. Roof, banner and chimney
4. I also added snow to the sisal trees, to make them more snowy
For the logo post - I added a deeper lump of snow where I wanted the post to be placed, then I made a hole in the snow with the dowel (see 3rd pic below), in order to be able to glue the post into the hole once the snow has dried.
Let the snow dry completely.


Step 7 - Add the Glitter
Now it's time to make your house sparkle!
For this, you will need glitter. I use Hemway Ultra Fine Craft Glitter - Iridescent White, but you can use any glitter you want. I prefer white glitter since I think it is more "snowy", but you can use colored glitter if you prefer.
You will also need: non-yellowing medium, paint brushes, a shaker or spoon to sprinkle the glitter, and a plate to collect the glitter leftovers.
Begin applying the medium with a brush on the yard (base). Work one small area at a time - the medium must remain wet for the glitter to stick to it.
Then, sprinkle glitter on the medium, and shake excess glitter into the plate.
Still working one small area at a time, continue applying the medium/glitter coating to gradually cover the whole yard, then the house from bottom to top. Keep shaking the excess glitter into the plate between each area. Don't forget to glitter the snow on the window edges and accessories.
Do NOT apply on the vellum windows, as the medium will wet the vellum and make it wrinkle.
Collect the glitter leftovers to reuse them for the next house.

Step 8 - Add the Final Touches
Use a cotton ball to add a smoke effect to the chimney.

Insert a battery operated LED tea light candle in the house - do NOT use a real candle!

And voilà! We now have one more glitter house ready to be placed under the Christmas tree :)


